Members of Ewenique are thrilled to return to meeting each month on the 4th Tuesday from 1.30 to 3.30 pm. Their venue remains New Earswick Folk Hall, Hawthorn Terrace, New Earswick, York YO32 4AQ. There’s parking and a café at the hall and Anne Bradley will be happy to let you have full details if you email anne.bradley@btinternet.com
2022
Starting over
We mentioned briefly last month that Carbery Machine Knitting Club had closed, but the group has started up again as Dorset & Hampshire Coastal Machine Knitting Club. Members meet monthly on the first Wednesday from 10.00 am to 12.00 noon at St Catherine’s Hall, 17 Marlow Drive, Christchurch BH23 2RR. For more details Janet Shuttleworth is your contact, so please email jan.knitting@outlook.com
Green for go
Dear Anne
My friend is having trouble knitting her garments and they all appear to be a different size. She does not use the Green Ruler and my question is would you be so kind as to explain this to me and I will pass it on to her. I haven’t been machine knitting for some time as I looked after my dad until he passed, then we moved house and just recently I had a bad fall so everything is on the back burner for now. Many thanks, Janice
Thanks for asking Janice and the Green Ruler is an excellent way of measuring the stitch and row tension of machine knitted swatches. It’s as accurate as most machine knitters require and can be used on all machines. A while ago, Sally Butcher wrote to say:-
Dear Anne
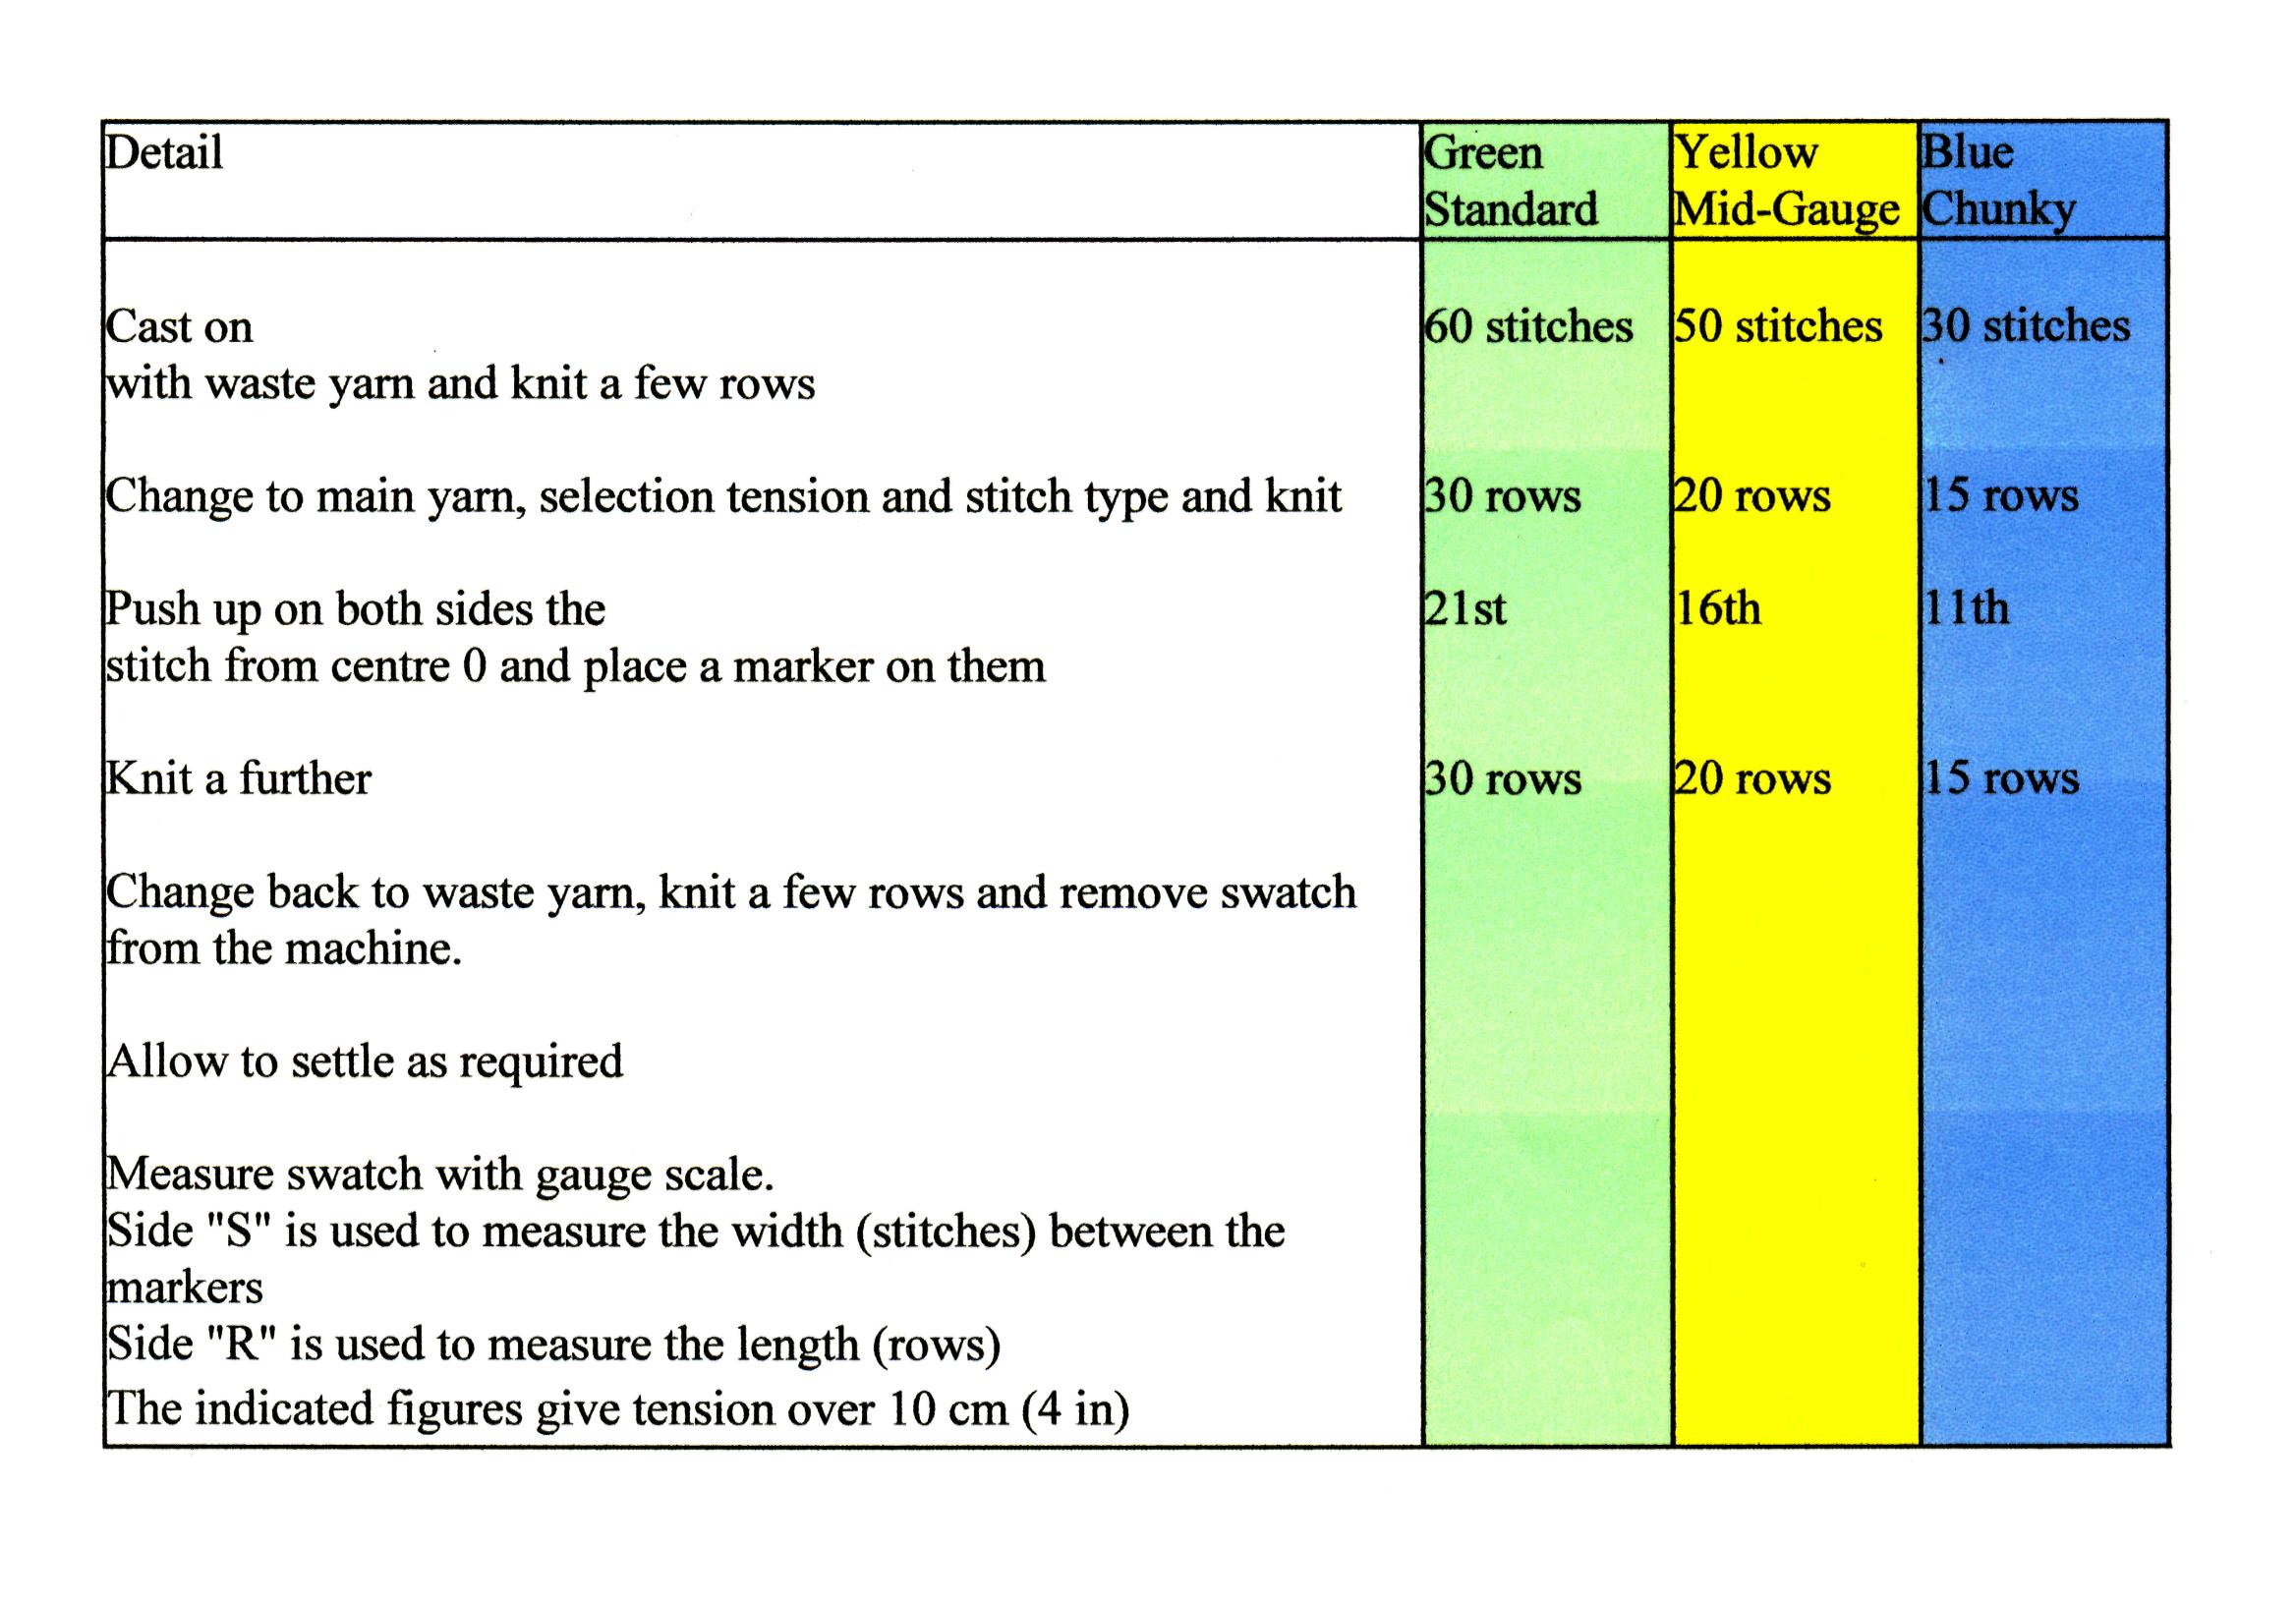
My chosen method of tension swatch measuring is to use the coloured rulers, as I’ve always been a Silver Reed (Knitmaster) fan and these were supplied with the machines. The three colours are used on the different gauge machines; green is for standard, yellow is for mid-gauge machines and blue is for chunky. They have different scales and are designed to measure different quantities of stitches and rows. It’s important to get this right in order to get an accurate swatch measurement.
• Green (standard) measures over 40 stitches and 60 rows.
• Yellow (mid-gauge) measures over 30 stitches and 40 rows.
• Blue (chunky) measures over 20 stitches and 30 rows.
I drew up a little table which I’ve printed off several times and laminated. I keep one with each machine and I’m happy for you to print it. With best wishes, Sally Butcher
Sally is one of our Knitting Buddies and she runs a club in Bodmin, Cornwall. She also has video demonstrations on her Facebook page, showing techniques on the SK280, LK150 and SK155 Silver Reed machines. The link is https://www.youtube.com/channel/UCSDxy6pQHAs4gd5XBztYWmw and it’s called Sally Butcher’s Kalamunda Krafts Machine Knitting.
No-sew
Dear Anne
I’m enclosing details, which may help knitters like me, who hate sewing and particularly backstitching through the neckband on the right side. I could never get it neat enough. This method doesn’t need to be stitched at all, which suits me fine. Maybe if you’ve a little space you could print it to help others, who aren’t so good at sewing! Yours sincerely, Lorraine in Colwyn Bay
1. Work over width of sts around neck, such as 130 arranged as 65-0-65.
2. Knit about 7 to 9 rows with WY. Carriage at left. K 1 row with nylon cord. Carriage at right.
3. K 4 rows in MY and 1 row on alt Ns in HP. Set carriage to slip both ways. Don’t set carriage to hold. Use MT such as Tension Dial setting 6.
4. Transfer sts to ribber, or use garter carriage with Pattern 532 for 1×1 rib. Put in comb and hang weights carefully if transferring.
5. Using MT-4, K 30 rows in 1×1 rib or use Pattern 532 on garter carriage. Transfer to main bed.
6. Pick up loops of 5th row of main yarn onto alt Ns. K 5 rows at MT.
7. Pick up first row (the one after the cord) and K 1 row at MT. Pick up neckline sts with wrong side facing you and K 1 row. Cast off using MT.
Cut ‘n’ sew
Dear Anne
I’ve just read in an old magazine the method of using the cut and sew neckline for Passap machines. When I was studying for my City & Guilds Certificate, I was shown a method for Japanese machines that doesn’t involve putting the garment on the bed of the machine. I think it was Carol Hocknell who showed us, but I can’t be sure so I apologise in advance if I’ve made a mistake. I’ve attached the method and you’ve probably seen it before but if not, perhaps you could use it in the magazine? Thank you for a great read every month and you must be tired of hearing it, but please keep the good work going if you can. King regards, Joan in Northampton
Join one shoulder, cut and sew the neck, find out how many stitches are needed for the rib and knit as follows.
1. Start rib on MT-2 or MT-3.
2. Knit first row and hang ribber comb.
3. Don’t knit any circular rows, as this makes it much easier to pick up these stitches.
4. Knit as many rows for the rib as you normally do, decreasing the tension and increasing again as you wish.
5. Transfer stitches to main bed, take off machine on waste yarn leaving a long thread of rib yarn for casting off.
6. With right side facing hang neckline on needles, pulling it behind latches.
7. Pick up last of row of rib before waste yarn, but not taking stitches behind latches.
8. You now have to pull these stitches through the cut and sew neck, so make sure all latches are closed and use a long tool. I use my ribber comb and pull the stitches through the neckline all in one go.
9. Pick up the cast on row of rib, ‘sandwiching’ the cut and sew between. There are now two stitches on every needle, so cast off behind the sinker posts using the long thread.
10. Join remaining shoulder and mattress stitch the neck seam.
Feel the width
Dear Anne
I’ve noticed you say on ribbed edges that it’s often easier to cast on with waste yarn, then pick up the stitches and hand knit the ribs downwards. Well, what do we ‘plus sizes’ do in tuck stitch patterns? It’s a great stitch for giving us the maximum width but tuck stitch patterns often have less stitches, so the ribs can be very tight and unwearable. Any suggestions please? Debbie in Northampton
Thanks for your query Debbie and here’s what to do.
Step 1 Knit the rib over the usual number of stitches required for your size. This will almost certainly be more than for the main tuck stitch garment.
Step 2 Transfer the stitches to the main bed, using main tension knit one row then remove the rib on waste yarn.
Step 3 Replace the stitches on the correct number of needles required for the pattern, decreasing evenly across, then continue to knit in pattern, as usual. This is also useful for anyone who doesn’t like a tight band of rib pulling in, say, the lower edge or cuff of a cardigan or jacket.
Tuck in
Dear Anne
I can’t tell you how thrilled I am to see the word ‘Passap’ in MKM. To be honest, I feel it’s a bit one-sided in favour of Duo 80 knitters, so here are some nice tuck stitch patterns for E6000 knitters. Thanks again and best wishes, Lydia in Rotherham
Single bed tuck stitch Use Stitch Pattern 1004 and T133. Using Col 1, K 4 rows. Using Col 2, K 4 rows. Repeat this 8-row sequence.
Double bed tuck stitch Use Stitch Pattern 1021, Colour Reverse and T139. First, let me tell you a little more about colour reverse. It’s the seventh option in Alter/Directions and reverses the pushers. This means that in a four row sequence, rows 3 and 4 become rows 1 and 2 and rows 1 and 2 become rows 3 and 4. Try doing this for a motif and making it a single motif and you’ll find the results are very interesting!
To obtain a single motif After enlarge position, go into Position and press ENT. Now press ENT three more times, then press No and ENT, No and ENT.
Eyes right
Dear Anne
Sadly my eyesight isn’t what it used to be and threading a tapestry needle with the garment yarn is more ‘miss’ than ‘hit’. As I was sewing up a sweater I’d made for him, my grandson watched me struggle. In the way they seem to know everything these days (!) he told me to put a loop of thin yarn through the eye, then thread the thick yarn into the loop to pull it through. I quickly worked out that sewing thread was the obvious choice and the answer to a prayer. Happy knitting, Mary in Exeter
A bit of fluff
Hi Anne
You might not approve of this one but I love all the fluffy yarns around these days. Yes, the fibres get caught up in the sinker posts if you use the normal knitting carriage, but not if you use the ribber carriage. I’ve used my ribber carriage this way on my standard gauge punchcard, electronic and chunky machines with great success. You can only do it for stocking stitch, but who wants to knit a complicated pattern in mohair anyway? Thanks for a great read every month and I love all the hints and tips, so this is mine. Best wishes, Sarah in Romford
All shook up
Dear Anne
The letter from Doreen in the December issue gave me lots more inspiration. My empty cones are part-filled with anything that rattles, such as sea shells or pasta. I close up the small hole at the top, cover and seal the base and the cone turns into a great ‘musical accompaniment’ for my grandchildren. In all honesty, it makes a big noise rather than a tune, but they love shaking and banging as loudly as they can! Best wishes, Christine in Plymouth