Please don’t print my full name, as I need to confess that I have bingo wings… big ones. I do like a bit of shaping on a sleeve, but I’m now having to resort to knitting straight sleeves and gathering them into the cuff. I feel as if I’m turning every cardigan into a bed jacket and it’s really getting me down. Have you any suggestions, please? I’ve come back to machine knitting after a long break, so I don’t really know who to ask. Yours sincerely, Mary
Please don’t worry Mary and let’s see what we can do. Many older-type sleeve patterns, especially the shapes for charting devices, increase the sleeve right up to the armhole level and then immediately start to shape the sleeve top. This is plainly silly! You don’t do all the work to get to the required upper arm width and then start to lose it straight away. Aim to knit at least 5 to 8 cm straight before starting to shape the top but, for yourself, you may need more. This will need the decreases altering, but one simple way is to put on say four more stitches at the cuff. (The rib will pull in this slight extra width.) If you’re increasing one stitch every tenth row, you’ll gain an extra 20 rows and double this if you add eight extra stitches. If the increases are every eighth row, you’ll gain 16 or 32 rows, either of which will give you a nice chunk of straight rows before shaping the sleeve head.
I really like the Anne Baker Karabee patterns. She’s so good with baby designs and they always fit really well. My one big problem is that I don’t know how to cast off behind the sinker posts. Can you tell me how to do it please? Kind wishes, Wendy
Thanks for asking Wendy and here’s the method.
Step 1 Starting at the same end as the carriage, use a single transfer tool and take the end stitch off the needle.
Step 2 Take the stitch behind the sinker post and place the eye of the transfer tool onto the hook of the next needle. Bring the needle a short way out so that the stitches are behind the latch of the needle.
Step 3 * Take the yarn around the hook of the needle and pull the needle back so the yarn goes through both stitches behind the latch.
Step 4 Now take this stitch behind the next sinker post and onto the next needle. Again, leave the needle out a short way so the stitches are behind the latch of the needle.
Step 5 Repeat from * until you’ve cast off all the stitches required, then release the stitches from around the sinker posts. This method is excellent for casting off under the arm and has a small amount of stretch.
Remember one thing, though. Before you start to knit, think carefully about the best technique you should use on certain areas of your garment. One of Anne Baker’s favourite techniques was her sinker post cast off, but it might not be your forte. Have you ever felt that a garment you’ve made could have looked better if you’d done something different? Choose the method you like, that you know you can do well. Making a lovely finished garment is far better than sticking slavishly to the exact detail on a knitting pattern!
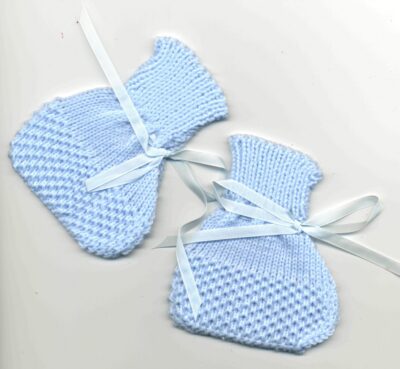
I’ve had your magazine more years than I can remember. Now my children have grown up, are having babies of their own and a new little boy is coming along this year. I remember knitting baby bootees that stayed on, looked good and were ever so quick and easy. I can’t be alone in happily knitting for a new generation. Thank you very much, Emily
BOOTEES
Yarn Any suitable 3-ply.
Machine Brother KH860 with a ribber.
To knit With carriage at right, cast on 41-0-40 sts in 1×1 rib and Tension 0/0. Work zigzag row, insert comb and small weights. Work 1 circular row. Cancel circular. Change to Tension 2/2 and K 1 row to right. Set RC at 000. K 12 rows. Transfer ribber sts to main bed. Change to Tension 5 and K 2 rows. Make a row of holes for ribbon by transferring every alt st to adjacent N. Leave empty Ns in WP. K 2 rows. Inc 1 st at beg of next 11 rows. Carriage on left. Insert Card 1 and lock. Programme machine to read card (KC button on KH860 machine). K 1 row to right. Set card to elongate, left tuck button in, release card and K 15 rows. (You could just work 15 rows in st st.) Dec 1 st at beg of next 8 rows. Cancel patterning (KC button to NL). K 1 row and cast off. Join seam. Thread ribbon and anchor it with a few sewing stitches at centre back, so ribbon can’t come out.
Could you please let us have an easy pattern for an adult balaclava. Most of my back issues are in the loft and I never venture up there in the winter. We live by the sea and it’s the only way I know to shield a man’s face from some of the biting wind. Thanks in advance, Nancy
Here’s a pattern for small, medium and large sizes, Nancy. Use any suitable 4-ply yarn with Tension Dial 7 and 3/3 for the 1×1 rib to give a firm fabric, about 30 stitches and 42 rows to 10 cm.
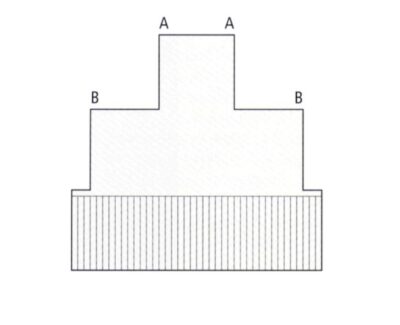
To knit Cast on 108 [118, 126] sts and K 40 rows 1×1 rib or 80 rows for mock rib. K 2 rows st st. Put 12 sts at each end (*) onto WY or a safety pin. K 60 rows st st. Put 30 sts (**) at each end onto WY or a stitch-holder. K 60 rows (***) st st. Using WY, K a few rows and release from machine.
To make up Refer to the diagram and join A to B by grafting 30 sts (**) onto 60 rows (***). Knit a band to go round the face by casting on 100 sts for all sizes and K 10 rows 1×1 rib or 20 rows for mock rib. Join 12 sts on each side (*) to edges of band, then join neckband at front and sew in ends.
I’m thoroughly ashamed of myself for forgetting one vital thing when knitting for charity. I work as a volunteer in a soup kitchen and at this time of year, there’s many of us on duty to help, so I decided to knit some old-fashioned but useful pot holders for picking up warm items. As oven gloves were in short supply, one of the cooks used two of my pot holders to lift a large metal pan from the stove. I’d headed for my stash and not taken sufficient care. I’d knitted most of them in wool, but some man-made yarn had crept into the mix. The man-made yarn immediately melted onto the pan. Her quick thinking and actions meant she only suffered slight burns to her hands, but I was absolutely terrified. Please, please print this warning to others. Only use pure wool for pot holders or anything going to war zones, where there will be fire and intense heat. I’ll give you my name, but would you kindly not print it and thank you for spreading the word.
These days, we can find lots of details on line for burn tests for different fibres. In a nutshell, animal fibres such as wool don’t ignite easily, smell like burning hair and leave ash we can crush easily. Man-made fibres melt, smell acrid and form hard plastic beads. Cotton burns quickly, smells like burnt paper or wood and leaves fine, light ash.
We had a discussion at the club about the new-look Dear Anne and overall we’re pleased. It’s hard to find somewhere for snippets of information, when you don’t want page after page to plough through. It’s reminded us it’s a bit like Beryl Jarvis’ Info Sheets and we have a request for you. Please can you find the pattern of some very useful slippers you published back in the mists of time. We’ve all made them at the club, but none of us can remember the pattern, especially where the folds go. They were knitted on a chunky machine and great for using up oddments. They pack flat and we highly recommend them as a great stash-buster, that are also very practical. Here’s hoping and best wishes from all of us, Ruth
It took a bit of searching, Ruth, but we’ve found them and also included some hand knitting instructions. It’s such a simple pattern, you can sit by the fire in the evening and make them in next-to-no-time.
Machine knit version
MATERIALSUse three ends of any DK or five ends of any 4-ply and the finished weight is no more than 100 grams. Version A Small amount in Dark Brown (MC) and Pink (C). Version B Small amount in Dark Brown (MC), Mustard (A), Pink (B), Green (C), Wine (D), Cream (E) and mixture of B, C and E tog (F).
SIZES & TENSIONSize 3-4 13 sts and 22 rows to 7.5cm, 3in over garter stitch at Tension 6. Size 5-6 13 sts and 22 rows to 8cm, 3¼in over garter stitch at Tension 7. Size 7-8 13 sts and 22 rows to 9cm, 3½in over garter stitch at Tension 8.
GARTER STITCH K 2 rows. Drop every stitch one row down and reform. These 2 rows form the pattern.
VERSION ALeft slipper With carriage at right and using MC, cast on 13 sts by hand. Set RC at 000. Using MT, cont in garter st. K 22 rows. Carriage is at right. Cast on 13 sts at right edge. 26 sts. K 44 rows. Carriage is at right. Using a length of MC, cast off 13 sts at left. 13 sts. Using C, K 22 rows. RC shows 88. Cast off. Right slipper Work as for left slipper, reversing shaping by reading left for right and right for left. Making up Lay left slipper down as Diagram 1 (right side is uppermost) and reverse for right slipper. Fold left slipper as shown in Diagram 2 and reverse for right slipper. Oversew seams on wrong side as indicated on Diagram 2 and reverse for right slipper. Turn to right side, push into shape and decorate.
VERSION BLeft slipper First strip With carriage at right and using MC, cast on 13 sts by hand. Set RC at 000. Using MT, cont in garter st. K 22 rows. Using A, K 22 rows. Using B, K 22 rows. RC shows 66. Cast off. Second strip With carriage at right and using C, cast on 13 sts by hand. Set RC at 000. Using MT, cont in garter st. K 22 rows. Using D, K 22 rows. Using F, K 22 rows. RC shows 66. Cast off. Right slipper Work as for left slipper. Making up Lay first and second strips of left slipper down as Diagram 3 (wrong side is uppermost) and reverse for right slipper. Oversew seam on wrong side as on Diagram 3 and reverse for right slipper. Turnover as Diagram 4 (right side is uppermost) and reverse for right slipper. Fold left slipper as shown in Diagram 2 and reverse for right slipper. Oversew seams on wrong side as on Diagram 2 and reverse for right slipper. Turn to right side, push into shape and decorate.
VARIATIONSVersion A Knit first 44 rows in MC and last 44 rows in C. +Version BFirst strip Knit 44 rows in MC and 22 rows in C. Second strip Knit 22 rows in C and 44 rows in MC.
Hand knit version
You can make these slippers quickly and easily by hand. If you’ve a young grandchild who knits, they’re ideal to make as a gift. They’re knitted in garter stitch on big needles and you can help with the size of needle. You need a pair of 5 mm or 5¼ mm knitting needles and the materials are the same as the machine knitted version. The size of needle and tightness of knitting will determine the size of the finished slipper, so first knit a tension square.
Tension square Using three strands of DK or five strands of 4-ply yarn, cast on 13 sts. Slip the first stitch of every row and garter stitch (every row knit) for 22 rows. Aim at a square with 8.25cm, 3¼in sides to fit an average foot with shoe size 5 to 6. If the finished square measures 7.5cm, 3 in, the slipper will fit shoe sizes 3 to 4. If the finished square measures 9cm, 3½in, the slipper will fit shoe sizes 7 to 8.
TO KNIT Cast on 13 sts and work 22 rows garter stitch (every row knit). Cast on 13 sts, then work 44 rows across these 26 sts. Cast off 13 sts and work 22 rows on remaining 13 sts. Cast off. If a definite right and left slipper is required, 23 rows for the first square makes the 13 stitch cast on at the opposite edge.
ALTERNATIVE METHOD Cast on 13 sts and work 66 rows, changing colour three times. Make two strips for each slipper. Fold as shown in the diagram and stitch the oversewing from the inside. Turn right side out and push into shape.
I thought I’d just pass on a quick word to someone who would sympathise and, more importantly, let others know. I have the moth! I’ve had to check all my cones and throw out anything slightly suspect. Strangely they didn’t seem to go for oiled wool and neither have they a taste for any of my Nina Miklin yarns. (I’m sure she’ll be pleased to hear!) It’s a lesson to be learnt by all and there is still a place for annual spring cleaning! Everyone needs to be checking. As I’ve not been knitting, it never even crossed my mind to do anything as tedious as inspecting my stash for any unwanted friends. Do please let your readers know, Anne and best wishes, Sue
My MKM downloaded on the first attempt this morning, so there was no ironing done this morning! It was just like meeting up with an old friend. We emigrated from London to New Zealand in 2010 and MKM is very hard to find here, so I was very happy to hear that you’ve gone digital. You won’t remember me, because you were surrounded by happy knitters at a Knit & Stitch event in London. I won a free MKM magazine from your stall about 25 years ago and have still got it. That started my journey into a lifetime of clubs, workshops and wonderful new friends. Thank you again Anne and all good wishes, Ann
Last week we were parked on the access road to a local car park when an officially-dressed man approached us. He told us that as of three days ago the rules had changed and we had to register my Blue Badge to park there. As we hadn’t done so, we must pay £2 at the car park ticket machine so he could cancel a pending fine. Advised by the ‘official’ my husband went to the machine and it swallowed his card. The man asked me to try a different card, which also disappeared into the machine. We then went to move our car. Very soon after a large amount of cash was stolen from each of our bank accounts. Please warn your readers, in case there’s a similar scam in their area. The man was very plausible and it never crossed our minds to grasp what he was doing. Thank you Anne for letting others know and sending you best wishes. (Full name and address supplied.)
I’ve known our reader for a very long time and, together with her husband, they’ve always been exceptionally vigilant and taken every possible care. They were terribly upset to discover they’d been scammed. There was also the added worry of losing their cards along with a lot of money. Additionally, they’d to wait several days for both banks to investigate. In due course it was concluded they were telling the truth, had indeed been robbed and were reimbursed by their banks. They’d not had their Blue Badge for long, so were unsure of all the requirements. Our reader asked me to tell you about her dreadful experience, hoping it may save just one of you from suffering the pain of what’s happened to them.
In the February 2025 issue and the pattern for ‘Blue Skies’ on Page 22, only Chart A is shown. I can find no chart for Punch Tuck Rib B. Please help and many thanks, Marjory
Thanks for asking Marjorie, but you only need one card. As you’ll read, it’s the carriage settings that change the pattern.